Deploying SAS Viya on multi-AZ enabled EKS clusters
Introduction
This deployment guide provides instructions on deploying SAS Viya on an EKS cluster that is deployed across multiple availability zones. The instructions are designed to deliver an environment that aligns to the Multi Availability Zone Deployment on AWS reference architecture.
The instructions cover both the deployment of the infrastructure as well as the deployment of SAS Viya on top of that infrastructure.
This guides uses the SAS Viya 4 Infrastructure as Code (IaC) for Amazon Web Services (AWS) project to perform the infrastructure deployment, but other ways of deploying the infrastructure are of course a valid choice as well.
Scenario
The goal of this guide is to provide instructions on deploying an AWS EKS cluster across multiple availability zones and configuring the Viya environment accordingly. At the end of the guide, the environment should look like the one described in the related reference architecture:
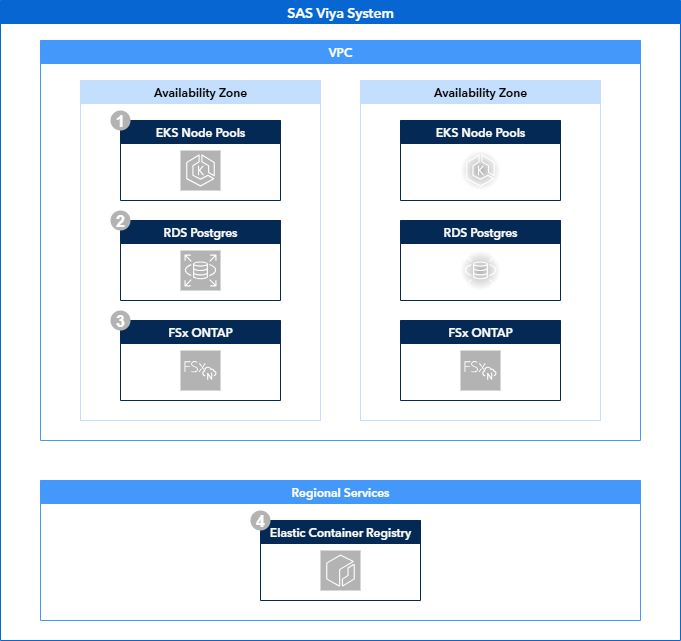
Solution Overview
This deployment guides consists of three sections: deploying the infrastructure, fulfilling the SAS Viya prerequisites and deploying SAS Viya.
Infrastructure
To deploy the infrastructure we use the viya4-iac-aws project, made available on GitHub. The Viya 4 Infrastructure as Code repositories provide a starting point in creating Infrastructure as Code assets based on Terraform. Instructions on how to use this project to deploy infrastructure using the recommended docker method can be found here.
IaC preparation
To serve our needs, we make the following adjustments to the default IaC scripts:
-
In the locals.tf file, add the following key-value mapping to the user_node_pool block :
This addition allows us, together with the related change in the variables.tf file to specify a specific subnet for each node pool. This is required as we want to be able to deploy node pools in specific availability zones, which are linked to the associated subnets.
-
In the main.tf file, add the following key-value mapping to the PostgreSQL module:
Although not strictly required, without specifying the db_name variable, no database will be created within the PostgreSQL instance. This can be done manually after the infrastructure deployment has finished, but with this small modification it is taken care of during infrastructure deployment.
-
In the variables.tf file, add subnet_number as a variable within the node_pools configurations, for instance insert it above the existing min_nodes variable:
This add the subnet_number as a valid variable for a node pool.
Also add the subnet number to all the default node pools before the min_nodes variable:
Also add db_name as a variable to default PostgreSQL server, for instance above the administrator_login variable:
SharedServices is the name of the database SAS Viya expects to find by default for it's internal database server.
Finally, add a completely new variable for the SVM Administrator password:
# The ONTAP administrative password for the svmadmin user that you can use to administer your Storage Virtual Machine using the ONTAP CLI and REST API.
variable "aws_fsx_ontap_svmadmin_password" {
  description = "The ONTAP administrative password for the fsxadmin user that you can use to administer your Storage Virtual Machine using the ONTAP CLI and REST API."
  type        = string
  default     = "v3RyS3cretPa$sw0rd"
}
This change, along with the related change in the vms.tf file allows us to specify the administrator password for the FSx for ONTAP Storage Virtual Machine. This is required for the Trident storage provisioner which we will deploy later on.
-
In the vms.tf file, add route_table_ids to the aws_fsx_ontap_file_system resource, for example before the existing tags option:
This change makes sure that the FSx for ONTAP file system will utilize the same routing table as will be configured for the subnets containing the Kubernetes nodes. This ensures that the workloads running on the Kubernetes cluster are able to reach the endpoints of the FSx for ONTAP filesystem.
Finally add the SVM Administrator password to the aws_fsx_ontap_storage_virtual_machine resource, for instance before the existing name option.
As was mentioned before, this change allows setting the SVM administrator password required for the Trident storage provisioner.
With these changes made, you can now build the Docker container that will run the Terraform process:
IaC execution
To deploy the infrastructure that supports the reference architecture, we create a terraform.tfvars file a number of sections. In this example we deploy to us-east-1 in availability zones D and E.
General Options
- These options can be defined as required
Networking
# Networking
subnets = {
    "private"       : ["192.168.0.0/18", "192.168.64.0/18"],
    "control_plane" : ["192.168.130.0/28", "192.168.130.16/28"]
    "public"        : ["192.168.129.0/25", "192.168.129.128/25"],
    "database"      : ["192.168.128.0/25", "192.168.128.128/25"]
}

subnet_azs = {
  "private"       : ["us-east-1d", "us-east-1e"],
  "control_plane" : ["us-east-1d", "us-east-1e"],
  "public"        : ["us-east-1d", "us-east-1e"],
  "database"      : ["us-east-1d", "us-east-1e"]
}

## Note that without specifying your CIDR block access rules,
## ingress traffic to your cluster will be blocked by default
default_public_access_cidrs = [] # e.g., ["123.45.6.89/32"]
- The subnet CIDRs can be configured as desired, as long as the address space for each of the subnets is sufficient for their purpose. The example subnet sizes should be sufficient in most scenarios, but tuning may be required to support specific workloads.
- Also take into account that these CIDR ranges should not overlap with existing CIDR ranges in your network.
- The subnet to availability zone mapping can also be configured as desired.
- The default Public access CIDRs can be left empty, but the public endpoints of the AWS resources that are being created will only accessible through authenticated AWS clients (for example, the AWS Portal, the AWS CLI, etc.). There are multiple options to configure the network CIDRs that have access to the create resources. You can review these here.
- For the external RDS PostgreSQL server, the only option that has to be changed is the "multi_az" option. Other options can optionally, and in the case of the passwords, should be changed. See the available options here.
EKS Configuration
# Cluster config
kubernetes_version           = "1.32"
default_nodepool_node_count  = 2
default_nodepool_vm_type     = "r6in.xlarge"
default_nodepool_custom_data = ""

# Cluster Node Pools config
node_pools = {
  cascontroller_0 = {
    "vm_type"       = "r6idn.xlarge"
    "cpu_type"      = "AL2023_x86_64_STANDARD"
    "os_disk_type"  = "gp2"
    "os_disk_size"  = 200
    "os_disk_iops"  = 0
    "subnet_number" = 0
    "min_nodes"     = 2
    "max_nodes"     = 2
    "node_taints"   = ["workload.sas.com/class=cascontroller:NoSchedule"]
    "node_labels"   = {
      "workload.sas.com/class" = "cascontroller"
    }
    "custom_data"                          = "./files/custom-data/additional_userdata.sh"
    "metadata_http_endpoint"               = "enabled"
    "metadata_http_tokens"                 = "required"
    "metadata_http_put_response_hop_limit" = 1
  },
  cascontroller_1 = {
    "vm_type"       = "r6idn.xlarge"
    "cpu_type"      = "AL2023_x86_64_STANDARD"
    "os_disk_type"  = "gp2"
    "os_disk_size"  = 200
    "os_disk_iops"  = 0
    "subnet_number" = 1
    "min_nodes"     = 0
    "max_nodes"     = 2
    "node_taints"   = ["workload.sas.com/class=cascontroller:NoSchedule"]
    "node_labels"   = {
      "workload.sas.com/class" = "cascontroller"
    }
    "custom_data"                          = "./files/custom-data/additional_userdata.sh"
    "metadata_http_endpoint"               = "enabled"
    "metadata_http_tokens"                 = "required"
    "metadata_http_put_response_hop_limit" = 1
  },
  casworker_0 = {
    "vm_type"       = "r6idn.2xlarge"
    "cpu_type"      = "AL2023_x86_64_STANDARD"
    "os_disk_type"  = "gp2"
    "os_disk_size"  = 200
    "os_disk_iops"  = 0
    "subnet_number" = 0
    "min_nodes"     = 2
    "max_nodes"     = 2
    "node_taints"   = ["workload.sas.com/class=casworker:NoSchedule"]
    "node_labels"   = {
      "workload.sas.com/class" = "casworker"
    }
    "custom_data"                          = "./files/custom-data/additional_userdata.sh"
    "metadata_http_endpoint"               = "enabled"
    "metadata_http_tokens"                 = "required"
    "metadata_http_put_response_hop_limit" = 1
  },
  casworker_1 = {
    "vm_type"       = "r6idn.2xlarge"
    "cpu_type"      = "AL2023_x86_64_STANDARD"
    "os_disk_type"  = "gp2"
    "os_disk_size"  = 200
    "os_disk_iops"  = 0
    "subnet_number" = 1
    "min_nodes"     = 0
    "max_nodes"     = 2
    "node_taints"   = ["workload.sas.com/class=casworker:NoSchedule"]
    "node_labels"   = {
      "workload.sas.com/class" = "casworker"
    }
    "custom_data"                          = "./files/custom-data/additional_userdata.sh"
    "metadata_http_endpoint"               = "enabled"
    "metadata_http_tokens"                 = "required"
    "metadata_http_put_response_hop_limit" = 1
  },
  compute_0 = {
    "vm_type"       = "m6idn.xlarge"
    "cpu_type"      = "AL2023_x86_64_STANDARD"
    "os_disk_type"  = "gp2"
    "os_disk_size"  = 200
    "os_disk_iops"  = 0
    "subnet_number" = 0
    "min_nodes"     = 2
    "max_nodes"     = 5
    "node_taints"   = ["workload.sas.com/class=compute:NoSchedule"]
    "node_labels"   = {
      "workload.sas.com/class"        = "compute"
      "launcher.sas.com/prepullImage" = "sas-programming-environment"
    }
    "custom_data"                          = ""
    "metadata_http_endpoint"               = "enabled"
    "metadata_http_tokens"                 = "required"
    "metadata_http_put_response_hop_limit" = 1
  },
  compute_1 = {
    "vm_type"       = "m6idn.xlarge"
    "cpu_type"      = "AL2023_x86_64_STANDARD"
    "os_disk_type"  = "gp2"
    "os_disk_size"  = 200
    "os_disk_iops"  = 0
    "subnet_number" = 1
    "min_nodes"     = 0
    "max_nodes"     = 5
    "node_taints"   = ["workload.sas.com/class=compute:NoSchedule"]
    "node_labels"   = {
      "workload.sas.com/class"        = "compute"
      "launcher.sas.com/prepullImage" = "sas-programming-environment"
    }
    "custom_data"                          = ""
    "metadata_http_endpoint"               = "enabled"
    "metadata_http_tokens"                 = "required"
    "metadata_http_put_response_hop_limit" = 1
  },
  stateless_0 = {
    "vm_type"       = "m6in.xlarge"
    "cpu_type"      = "AL2023_x86_64_STANDARD"
    "os_disk_type"  = "gp2"
    "os_disk_size"  = 200
    "os_disk_iops"  = 0
    "subnet_number" = 0
    "min_nodes"     = 4
    "max_nodes"     = 5
    "node_taints"   = ["workload.sas.com/class=stateless:NoSchedule"]
    "node_labels"   = {
      "workload.sas.com/class" = "stateless"
    }
    "custom_data"                          = ""
    "metadata_http_endpoint"               = "enabled"
    "metadata_http_tokens"                 = "required"
    "metadata_http_put_response_hop_limit" = 1
  },
  stateless_1 = {
    "vm_type"       = "m6in.xlarge"
    "cpu_type"      = "AL2023_x86_64_STANDARD"
    "os_disk_type"  = "gp2"
    "os_disk_size"  = 200
    "os_disk_iops"  = 0
    "subnet_number" = 1
    "min_nodes"     = 0
    "max_nodes"     = 5
    "node_taints"   = ["workload.sas.com/class=stateless:NoSchedule"]
    "node_labels"   = {
      "workload.sas.com/class" = "stateless"
    }
    "custom_data"                          = ""
    "metadata_http_endpoint"               = "enabled"
    "metadata_http_tokens"                 = "required"
    "metadata_http_put_response_hop_limit" = 1
  },
  stateful_0 = {
    "vm_type"       = "m6in.xlarge"
    "cpu_type"      = "AL2023_x86_64_STANDARD"
    "os_disk_type"  = "gp2"
    "os_disk_size"  = 200
    "os_disk_iops"  = 0
    "subnet_number" = 0
    "min_nodes"     = 3
    "max_nodes"     = 3
    "node_taints"   = ["workload.sas.com/class=stateful:NoSchedule"]
    "node_labels"   = {
      "workload.sas.com/class" = "stateful"
    }
    "custom_data"                          = ""
    "metadata_http_endpoint"               = "enabled"
    "metadata_http_tokens"                 = "required"
    "metadata_http_put_response_hop_limit" = 1
  },
  stateful_1 = {
    "vm_type"       = "m6in.xlarge"
    "cpu_type"      = "AL2023_x86_64_STANDARD"
    "os_disk_type"  = "gp2"
    "os_disk_size"  = 200
    "os_disk_iops"  = 0
    "subnet_number" = 1
    "min_nodes"     = 0
    "max_nodes"     = 3
    "node_taints"   = ["workload.sas.com/class=stateful:NoSchedule"]
    "node_labels"   = {
      "workload.sas.com/class" = "stateful"
    }
    "custom_data"                          = ""
    "metadata_http_endpoint"               = "enabled"
    "metadata_http_tokens"                 = "required"
    "metadata_http_put_response_hop_limit" = 1
  }
}
- The node pool configuration can be adjusted to follow the specific sizing document for your environment. What is important is to create separate node pools in separate subnets. This is why the additional "subnet_number" was added to the node pool definition.
Storage
- The storage options above are mandatory for this specific scenario and should not be changed.
- Creating a Jump VM is not required, but can be useful in cases where network access to Kubernetes API is restricted.
Once the terraform.tfvars file has been configured to your liking, you can start the Terraform process as described here.
When the Terraform process is finished, the both node pools will have instances running. To make sure SAS will only run in one availability zone at a time, the node pools in the secondary availability zone should be scaled down to zero.
You can use the AWS CLI for this. For example:
aws eks update-nodegroup-config \
    --cluster-name <your cluster name> \
    --nodegroup-name cascontroller_1 \
    --scaling-config minSize=0,maxSize=2,desiredSize=0
Prerequisites
The provisioning of prerequisites is no different from default deployments and is described in the SAS Viya Operations Guide.
The exception here is the installation of Trident, which provides volume provisioning on FSx for ONTAP for both RWO block devices and RWX shared filesystems. The deployment of Trident for FSx for ONTAP is described here.
Once Trident has been installed on the EKS cluster, we need to create the StorageClasses SAS Viya is going to use. We need to create both an RWO and RWX storage class:
storageclass-san.yaml
storageclass-nas.yaml
The storage class "ontap-san" will serve as the RWO storage class, while the "ontap-nas" storage class will server as the RWX storage class.
These storage class definitions rely on backends which we will define next:
backendconfig-san.yaml
backendconfig-nas.yaml
apiVersion: trident.netapp.io/v1
kind: TridentBackendConfig
metadata:
  name: backend-tbc-ontap-nas
  namespace: trident
spec:
  version: 1
  storageDriverName: ontap-nas
  backendName: tbc-ontap-nas
  svm: <svm name>
  managementLIF: <SVM Management Endpoint>
  dataLIF: <SVM Management Endpoint>
  useREST: false
  credentials:
    name: backend-tbc-ontap-secret
These backend configurations need to be supplied with the name of the Storage Virtual Machine and the associated management endpoint.
- The SVM name is always \<prefix>-ontap-svm
- The SVM management endpoint is provided in the output of the IaC process as the "rwx_filestore_endpoint"
The final object to create is a secret that contains the credentials to authenticate to the Storage Virtual Machine:
trident-tbc-secret.yaml
The secret shown above is the default value, which should be adjusted to the actual value configured in your terraform.tfvars file.
Deploying SAS Viya
The deployment of SAS Viya is documented in the SAS Viya Platform Operations guide. Customization of a SAS Viya deployment is done through the use of kustomize and controlled with a central kustomization.yaml.
For this deployment, a number of customizations are required. We will link to the relevant documentation and supply additional information if required:
- Add a Backup Controller for CAS
- A backup controller ensures the loss of a single node does not cause the loss of the entire CAS server
- Change the Number of Workers for CAS
- Having at least two CAS workers ensures the loss of a single node does not cause the loss of the entire CAS server
- Change the SAS Configuration Server Storage Class
- The SAS Configuration Server should use block storage. Therefore configure it to use the ontap-san storage class.
- Change the SAS Message Broker Storage Class
- The SAS Message Broker should use block storage. Therefore configure it to use the ontap-san storage class.
- Change the SAS Redis Server Storage Class
- The SAS Redis Server should use block storage. Therefore configure it to use the ontap-san storage class.
- Configure OpenSearch
- OpenSearch should use block storage. Therefore configure it to use the ontap-san storage class.
- OpenSearch should be enabled for High Availability.
- Configure the RWX storage class
- The storage class for RWX volumes is controlled through a single RWXStorageClass resource. This should be set to use ontap-nas.
Once these customizations have been configured, you can deploy SAS Viya as described here.
Additional Resources
Please also have a look at the related resources for this deployment guide: